Showing posts with label Windows. Show all posts

Friday, 22 April 2022

How to find the last interactive logons in Windows using PowerShell

Use the following powershell script to find the last users to login to a box since a given date, in this case the 21st April 2022 at 12pm until midnight on the 22nd April 2022 :-

  Get-WinEvent -FilterHashtable @{logname='Security'; id=4624; StartTime="2022-04-21 12:00"; EndTime="2022-04-22 00:00"} -MaxEvents 5000 | Where-Object {($_.Message -like '*Logon Type: 10*')} | select -Property @{Name = 'Info'; Expression = {$_.Message.SubString($_.Message.LastIndexOf("Network Account Name:") -195,300)}},Id, TimeCreated, Message -First 10 | fl Id, TimeCreated, Info


Further to this, to find all the times a particular user has logged on to a machine, use the following query


Get-WinEvent -LogName 'Security' -FilterXPath 'Event[System[EventID=4624] and EventData[Data[@Name="TargetUserName"]="justusernamenodomain"]]' -MaxEvents 10 | fl id, timecreated


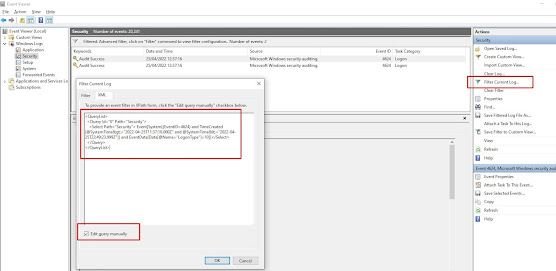
Alternatively you can edit the custom filter in the event log to look like this


<QueryList>

  <Query Id="0" Path="Security">

    <Select Path="Security">*[System[(EventID=4624) and TimeCreated[@SystemTime&gt;='2022-04-25T15:30:20.000Z' and @SystemTime&lt;='2022-04-25T16:30:20.999Z']]]

and *[EventData[Data[@Name="LogonType"]=10]]

</Select>

  </Query>

</QueryList>


Thursday, 2 September 2021

How to clear Windows run auto complete / auto suggest history in Windows 10


Clear the entries in HKEY_CURRENT_USER\Software\Microsoft\Windows\CurrentVersion\Explorer\RunMRU

Edit: AutoComplete in the Run box is set in (of course) Internet Explorer's settings (Content Tab / AutoComplete): there's a button to Delete Autocomplete History. If that doesn't work, you could try turning AutoComplete off, rebooting, and turning it on again.


Thanks to this link for the tip...

Clear Windows "Run" box cache | Newbedev


Tuesday, 22 January 2019

How to retrieve a list of programs installed on Windows using PowerShell

Use the following powershell command

Get-ItemProperty HKLM:\Software\Wow6432Node\Microsoft\Windows\CurrentVersion\Uninstall\* | Select-Object DisplayName, DisplayVersion, Publisher, InstallDate | Sort-object -Property DisplayName | Format-Table –AutoSize | Out-File \temp\myinstalls.txt

Tuesday, 26 April 2016

JetBrains dotMemory not attaching = reload .NET perf counters

If you get an issue using dotMemory where it wont connect to the profiler, then run the following two commands from a .net command prompt…
unlodctr .NETFramework
lodctr C:\Windows\Inf\.NETFramework\corperfmonsymbols.ini

Wednesday, 13 January 2016

Extract job titles from AD using powershell

For a given list of userids in a file called users.txt use the following powershell command in the same directory


Get-Content users.txt | foreach {Get-ADUser -Identity $PSItem -Properties mail,title | select -Property mail, title} |Export-Csv users.csv

Or use this to find new starters in the organisation...

$lastWeek = (get-date).AddDays(-31);

Get-ADUser -Filter "Description -like 'London'"  -Properties Name, Title, Manager, whenCreated, DistinguishedName, LastLogonDate | ? whenCreated  -gt $lastWeek | select Name, Title, Manager, whenCreated, DistinguishedName, LastLogonDate | fl

Note: For windows 7 desktop users you’ll need to install the active directory modules for powershell by following the installation steps here
https://www.microsoft.com/en-gb/download/details.aspx?id=7887
For all active directory attributes / propery names, see this link here
http://www.kouti.com/tables/userattributes.htm
Another way to have done it would have been usng SQL via a linked server
https://www.mssqltips.com/sqlservertip/2580/querying-active-directory-data-from-sql-server/
e.g.
SELECT     *
FROM OPENQUERY( ADSI,
    'SELECT samaccountname, mail, title, sn
     FROM ''LDAP://dc=companyname,dc=com''
     WHERE objectCategory = ''Person'' AND objectClass= ''user''
     AND userprincipalname = ''*'' AND mail = ''*'' AND SN = ''*''
         ORDER BY useraccountcontrol
      ')
      Where
      samaccountname= ‘myaccountloginname’

Wednesday, 16 December 2015

Speech with windows powershell

Set-ExecutionPolicy Unrestricted -Force

<#
.Synopsis
   Allows you to speak on a remote computer
   Requires that you have run winrm qc on the remote machine
   or Enable-PSRemoting. And on the local machine you've changed
   Set-Item -Path WSMan:\localhost\Client\TrustedHosts -Value * -Force 
.DESCRIPTION
   Allows you to speak on a remote computer
.EXAMPLE
   Speak-Remote 1 "How are you today" REMOTE_PC
.EXAMPLE
   Speak-Remote -RemoteComputerName REMOTE_PC
#>
function Speak-Remote
{
    [CmdletBinding()]
    [OutputType([int])]
    Param
    (
        # Param1 help description
        [Parameter(Mandatory=$true,
                   ValueFromPipelineByPropertyName=$true,
                   Position=0)]
        [string]
        $Times = (Read-Host "How many Times"),

        # Param2 help description
        [Parameter(Mandatory=$true,
                   ValueFromPipelineByPropertyName=$true,
                   Position=1)]
        [string]
        $Message = (Read-Host "What should I say"),

        [Parameter(Mandatory=$true,
                   ValueFromPipelineByPropertyName=$true,
                   Position=2)]
        [string]
        $RemoteComputerName
    )

    Begin
    {
    }
    Process
    {
        Invoke-Command -ScriptBlock {Param($msg, $n) Add-Type -AssemblyName System.Speech; $o = New-Object -TypeName System.Speech.Synthesis.SpeechSynthesizer; $o.SelectVoice("Microsoft Zira Desktop") ; $y = 0; do { $o.Speak($msg);$y = $y + 1;} until ($y -eq $n) } -ComputerName $RemoteComputerName -ArgumentList $Message, $Times
    }
    End
    {
    }
}

Speak-Remote -RemoteComputerName REMOTE_PC

Monday, 23 February 2015

Windows 7 Weather Gadget: Cannot connect to service issue

Please follow this to fix the issue.

  1. Go to %localappdata%\Microsoft\Windows Live\Services\Cache
  2. Open "Config.xml" , Right click on it Select Edit, it will open in Notepad.
  3. Click on File>> Save (without doing any changes)
  4. Restart the Gadget after a Minute and it should start working.

However, it may be a temporary fix.  Many (myself included) report the problem returning. 

(Note: This fix appears to work, even if you're testing in IE10 with ActiveX settings as follows, using this code here http://jsfiddle.net/4aww6o3t/

and you get the Access is denied error from the call to oMSN.GetService("weather")

image

try
{
    // Connect to Weather Service .dll
    var oMSN = new ActiveXObject("wlsrvc.WLServices");
    var oMSN2 = new ActiveXObject("wlsrvc.WLServices");
    this.oMSN = oMSN.GetService("weather"); // Object to send and recieve weather data queries and to poll for service existence
    this.oMSN2 = oMSN2.GetService("weather"); // Object to send a latlong query and recieve a location code corresponding to the latlong
}
catch (objException)
{
    this.isValid = false;
    this.statusMessage = getLocalizedString('ServiceNotAvailable');
    this.oMSN = new Object();
    this.oMSN2 = new Object();
}

Update: 10:48 03/03/2015

Have just managed to write a batch file that fixes this issue ongoing. By adding this batch file to a scheduled task using the Task Scheduler, I've managed to get the gadget to always work now.

Note to use this batch file you'll just have to create a copy of the Settings.ini and call it Settings3Monitors.ini in the folder %userprofile%\AppData\Local\Microsoft\Windows Sidebar

taskkill /IM sidebar.exe /T /F

REM Fix for windows security update

pushd "%localappdata%\microsoft\windows live\services\cache"

IF EXIST ConfigOriginal.xml. (

     echo ConfigOriginal.xml file exists

) ELSE (

     copy Config.xml ConfigOriginal.xml

)

attrib "%localappdata%\microsoft\windows live\services\cache\*.xml" -r

del Config.xml

copy ConfigOriginal.xml Config.xml

echo. >> "Config.xml"

popd

REM Restart sidebar

pushd "%userprofile%\AppData\Local\Microsoft\Windows Sidebar"

xcopy /Y Settings3Monitors.ini Settings.ini

popd

start "" sidebar.exe

Thursday, 19 June 2014

Batch file parameters

http://www.microsoft.com/resources/documentation/windows/xp/all/proddocs/en-us/percent.mspx?mfr=true

REM   The next lines to change directory just works.
REM
REM Set environ variable for the BAT current DIR
set batchDirectory=%~dp0
REM Strip away the trailing backslash
if "%batchDirectory:~-1%"=="\" set batchDirectory=%batchDirectory:~0,-1%

REM Make the batch directory the current directory and change the default drive
cd /D %batchDirectory%


Using batch parameters

You can use batch parameters anywhere within a batch file to extract information about your environment settings.

Cmd.exe provides the batch parameter expansion variables %0 through %9. When you use batch parameters in a batch file, %0 is replaced by the batch file name, and %1 through %9 are replaced by the corresponding arguments that you type at the command line. To access arguments beyond %9, you need to use the shift command. For more information about the shift command, see Shift The %* batch parameter is a wildcard reference to all the arguments, not including %0, that are passed to the batch file.

For example, to copy the contents from Folder1 to Folder2, where %1 is replaced by the value Folder1 and %2 is replaced by the value Folder2, type the following in a batch file called Mybatch.bat:

xcopy %1\*.* %2

To run the file, type:

mybatch.bat C:\folder1 D:\folder2

This has the same effect as typing the following in the batch file:

xcopy C:\folder1 \*.* D:\folder2

You can also use modifiers with batch parameters. Modifiers use current drive and directory information to expand the batch parameter as a partial or complete file or directory name. To use a modifier, type the percent (%) character followed by a tilde (~) character, and then type the appropriate modifier (that is, %~modifier).

The following table lists the modifiers you can use in expansion.

Modifier
Description

%~1

Expands %1 and removes any surrounding quotation marks ("").

%~f1

Expands %1 to a fully qualified path name.

%~d1

Expands %1 to a drive letter.

%~p1

Expands %1 to a path.

%~n1

Expands %1 to a file name.

%~x1

Expands %1 to a file extension.

%~s1

Expanded path contains short names only.

%~a1

Expands %1 to file attributes.

%~t1

Expands %1 to date and time of file.

%~z1

Expands %1 to size of file.

%~$PATH:1

Searches the directories listed in the PATH environment variable and expands %1 to the fully qualified name of the first one found. If the environment variable name is not defined or the file is not found, this modifier expands to the empty string.

The following table lists possible combinations of modifiers and qualifiers that you can use to get compound results.

Modifier
Description

%~dp1

Expands %1 to a drive letter and path.

%~nx1

Expands %1 to a file name and extension.

%~dp$PATH:1

Searches the directories listed in the PATH environment variable for %1 and expands to the drive letter and path of the first one found.

%~ftza1

Expands %1 to a dir-like output line.

Note

In the previous examples, you can replace %1 and PATH with other batch parameter values.

The %* modifier is a unique modifier that represents all arguments passed in a batch file. You cannot use this modifier in combination with the %~ modifier. The %~ syntax must be terminated by a valid argument value.

You cannot manipulate batch parameters in the same manner that you can manipulate environment variables. You cannot search and replace values or examine substrings. However, you can assign the parameter to an environment variable, and then manipulate the environment variable.

Thursday, 12 June 2014

Windows 7 keyboard shorcuts

http://windows.microsoft.com/en-us/windows/keyboard-shortcuts#keyboard-shortcuts=windows-7

Keyboard shortcuts

Windows 7


Keyboard shortcuts are combinations of two or more keys that, when pressed, can be used to perform a task that would typically require a mouse or other pointing device. Keyboard shortcuts can make it easier to interact with your computer, saving you time and effort as you work with Windows and other programs.

Most programs also provide accelerator keys that can make it easier to work with menus and other commands. Check the menus of programs for accelerator keys. If a letter is underlined in a menu, that usually means that pressing the Alt key in combination with the underlined key will have the same effect as clicking that menu item.

Pressing the Alt key in some programs, such as Paint and WordPad, shows commands that are labelled with additional keys that you can press to use them.

You can also create new keyboard shortcuts to open programs. For more information, see Create keyboard shortcuts to open programs.

Hide all

<?XML:NAMESPACE PREFIX = [default] http://www.w3.org/2000/svg NS = "http://www.w3.org/2000/svg" />

Ease of Access keyboard shortcuts

The following table contains keyboard shortcuts that can help make your computer easier to use.

Press this key
To do this

Right Shift for eight seconds

Turn Filter Keys on and off

Left Alt+Left Shift+PrtScn (or PrtScn)

Turn High Contrast on or off

Left Alt+Left Shift+Num Lock

Turn Mouse Keys on or off

Shift five times

Turn Sticky Keys on or off

Num Lock for five seconds

Turn Toggle Keys on or off

Windows logo key Picture of Windows logo key +U

Open the Ease of Access Center

General keyboard shortcuts

The following table contains general keyboard shortcuts.

Press this key
To do this

F1

Display Help

Ctrl+C (or Ctrl+Insert)

Copy the selected item

Ctrl+X

Cut the selected item

Ctrl+V (or Shift+Insert)

Paste the selected item

Ctrl+Z

Undo an action

Ctrl+Y

Redo an action

Delete (or Ctrl+D)

Delete the selected item and move it to the Recycle Bin

Shift+Delete

Delete the selected item without moving it to the Recycle Bin first

F2

Rename the selected item

Ctrl+Right Arrow

Move the cursor to the beginning of the next word

Ctrl+Left Arrow

Move the cursor to the beginning of the previous word

Ctrl+Down Arrow

Move the cursor to the beginning of the next paragraph

Ctrl+Up Arrow

Move the cursor to the beginning of the previous paragraph

Ctrl+Shift with an arrow key

Select a block of text

Shift with any arrow key

Select more than one item in a window or on the desktop, or select text within a document

Ctrl with any arrow key+Spacebar

Select multiple individual items in a window or on the desktop

Ctrl+A

Select all items in a document or window

F3

Search for a file or folder

Alt+Enter

Display properties for the selected item

Alt+F4

Close the active item, or exit the active program

Alt+Spacebar

Open the shortcut menu for the active window

Ctrl+F4

Close the active document (in programs that allow you to have multiple documents open simultaneously)

Alt+Tab

Switch between open items

Ctrl+Alt+Tab

Use the arrow keys to switch between open items

Ctrl+Mouse scroll wheel

Change the size of icons on the desktop

Windows logo key Picture of Windows logo key +Tab

Cycle through programs on the taskbar by using Aero Flip 3-D

Ctrl+Windows logo key Picture of Windows logo key +Tab

Use the arrow keys to cycle through programs on the taskbar by using Aero Flip 3-D

Alt+Esc

Cycle through items in the order in which they were opened

F6

Cycle through screen elements in a window or on the desktop

F4

Display the address bar list in Windows Explorer

Shift+F10

Display the shortcut menu for the selected item

Ctrl+Esc

Open the Start menu

Alt+underlined letter

Display the corresponding menu

Alt+underlined letter

Perform the menu command (or other underlined command)

F10

Activate the menu bar in the active program

Right Arrow

Open the next menu to the right, or open a submenu

Left Arrow

Open the next menu to the left, or close a submenu

F5 (or Ctrl+R)

Refresh the active window

Alt+Up Arrow

View the folder one level up in Windows Explorer

Esc

Cancel the current task

Ctrl+Shift+Esc

Open Task Manager

Shift when you insert a CD

Prevent the CD from automatically playing

Left Alt+Shift

Switch the input language when multiple input languages are enabled

Ctrl+Shift

Switch the keyboard layout when multiple keyboard layouts are enabled

Right or Left Ctrl+Shift

Change the reading direction of text in right-to-left reading languages

Dialog box keyboard shortcuts

The following table contains keyboard shortcuts for use in dialog boxes.

Press this key
To do this

Ctrl+Tab

Move forward through tabs

Ctrl+Shift+Tab

Move back through tabs

Tab

Move forward through options

Shift+Tab

Move back through options

Alt+underlined letter

Perform the command (or select the option) that goes with that letter

Enter

Replaces clicking the mouse for many selected commands

Spacebar

Select or clear the check box if the active option is a check box

Arrow keys

Select a button if the active option is a group of option buttons

F1

Display Help

F4

Display the items in the active list

Backspace

Open a folder one level up if a folder is selected in the Save As or Open dialog box

Windows logo key keyboard shortcuts

The following table contains keyboard shortcuts that use the Windows logo key Picture of Windows logo key.

Press this key
To do this

Windows logo key Picture of Windows logo key

Open or close the Start menu.

Windows logo key Picture of Windows logo key +Pause

Display the System Properties dialog box.

Windows logo key Picture of Windows logo key +D

Display the desktop.

Windows logo key Picture of Windows logo key +M

Minimize all windows.

Windows logo key Picture of Windows logo key +Shift+M

Restore minimized windows to the desktop.

Windows logo key Picture of Windows logo key +E

Open Computer.

Windows logo key Picture of Windows logo key +F

Search for a file or folder.

Ctrl+Windows logo key Picture of Windows logo key +F

Search for computers (if you're on a network).

Windows logo key Picture of Windows logo key +L

Lock your computer or switch users.

Windows logo key Picture of Windows logo key +R

Open the Run dialog box.

Windows logo key Picture of Windows logo key +T

Cycle through programs on the taskbar.

Windows logo key Picture of Windows logo key+number

Start the program pinned to the taskbar in the position indicated by the number. If the program is already running, switch to that program.

Shift+Windows logo key Picture of Windows logo key+number

Start a new instance of the program pinned to the taskbar in the position indicated by the number.

Ctrl+Windows logo key Picture of Windows logo key+number

Switch to the last active window of the program pinned to the taskbar in the position indicated by the number.

Alt+Windows logo key Picture of Windows logo key+number

Open the Jump List for the program pinned to the taskbar in the position indicated by the number.

Windows logo key Picture of Windows logo key +Tab

Cycle through programs on the taskbar by using Aero Flip 3-D.

Ctrl+Windows logo key Picture of Windows logo key +Tab

Use the arrow keys to cycle through programs on the taskbar by using Aero Flip 3-D.

Ctrl+Windows logo key Picture of Windows logo key +B

Switch to the program that displayed a message in the notification area.

Windows logo key Picture of Windows logo key +Spacebar

Preview the desktop.

Windows logo key Picture of Windows logo key +Up Arrow

Maximize the window.

Windows logo key Picture of Windows logo key +Left Arrow

Maximize the window to the left side of the screen.

Windows logo key Picture of Windows logo key +Right Arrow

Maximize the window to the right side of the screen.

Windows logo key Picture of Windows logo key +Down Arrow

Minimize the window.

Windows logo key Picture of Windows logo key +Home

Minimize all but the active window.

Windows logo key Picture of Windows logo key +Shift+Up Arrow

Stretch the window to the top and bottom of the screen.

Windows logo key Picture of Windows logo key +Shift+Left Arrow or Right Arrow

Move a window from one monitor to another.

Windows logo key Picture of Windows logo key +P

Choose a presentation display mode.

Windows logo key Picture of Windows logo key +G

Cycle through gadgets.

Windows logo key Picture of Windows logo key +U

Open Ease of Access Center.

Windows logo key Picture of Windows logo key +X

Open Windows Mobility Center.

Windows Explorer keyboard shortcuts

The following table contains keyboard shortcuts for working with Windows Explorer windows or folders.

Press this key
To do this

Ctrl+N

Open a new window

Ctrl+W

Close the current window

Ctrl+Shift+N

Create a new folder

End

Display the bottom of the active window

Home

Display the top of the active window

F11

Maximize or minimize the active window

Ctrl+Period (.)

Rotate a picture clockwise

Ctrl+Comma (,)

Rotate a picture counter-clockwise

Num Lock+Asterisk (*) on numeric keypad

Display all subfolders under the selected folder

Num Lock+Plus Sign (+) on numeric keypad

Display the contents of the selected folder

Num Lock+Minus Sign (-) on numeric keypad

Collapse the selected folder

Left Arrow

Collapse the current selection (if it's expanded), or select the parent folder

Alt+Enter

Open the Properties dialog box for the selected item

Alt+P

Display the preview pane

Alt+Left Arrow

View the previous folder

Backspace

View the previous folder

Right Arrow

Display the current selection (if it's collapsed), or select the first subfolder

Alt+Right Arrow

View the next folder

Alt+Up Arrow

View the parent folder

Ctrl+Shift+E

Display all folders above the selected folder

Ctrl+Mouse scroll wheel

Change the size and appearance of file and folder icons

Alt+D

Select the address bar

Ctrl+E

Select the search box

Ctrl+F

Select the search box

Taskbar keyboard shortcuts

The following table contains keyboard shortcuts for working with items on the taskbar.

Press this key
To do this

Shift+Click on a taskbar button

Open a program or quickly open another instance of a program

Ctrl+Shift+Click on a taskbar button

Open a program as an administrator

Shift+Right-click on a taskbar button

Show the window menu for the program

Shift+Right-click on a grouped taskbar button

Show the window menu for the group

Ctrl+Click on a grouped taskbar button

Cycle through the windows of the group

Magnifier keyboard shortcuts

The following table contains keyboard shortcuts for working with Magnifier.

Press this key
To do this

Windows logo key Picture of Windows logo key+ Plus Sign (+) or Minus Sign (-)

Zoom in or out

Ctrl+Alt+Spacebar

Preview the desktop in full-screen mode

Ctrl+Alt+F

Switch to full-screen mode

Ctrl+Alt+L

Switch to lens mode

Ctrl+Alt+D

Switch to docked mode

Ctrl+Alt+I

Invert colors

Ctrl+Alt+arrow keys

Pan in the direction of the arrow keys

Ctrl+Alt+R

Resize the lens

Windows logo key Picture of Windows logo key+ Esc

Exit Magnifier

Remote Desktop Connection keyboard shortcuts

The following table contains keyboard shortcuts for working with Remote Desktop Connection.

Press this key
To do this

Alt+Page Up

Move between programs from left to right.

Alt+Page Down

Move between programs from right to left.

Alt+Insert

Cycle through programs in the order that they were started in.

Alt+Home

Display the Start menu.

Ctrl+Alt+Break

Switch between a window and full screen.

Ctrl+Alt+End

Display the Windows Security dialog box.

Alt+Delete

Display the system menu.

Ctrl+Alt+Minus Sign (-) on the numeric keypad

Place a copy of the active window, within the client, on the Terminal server clipboard (provides the same functionality as pressing Alt+PrtScn on a local computer).

Ctrl+Alt+Plus Sign (+) on the numeric keypad

Place a copy of the entire client window area on the Terminal server clipboard (provides the same functionality as pressing PrtScn on a local computer).

Ctrl+Alt+Right Arrow

“Tab” out of the Remote Desktop controls to a control in the host program (for example, a button or a text box). Useful when the Remote Desktop controls are embedded in another (host) program.

Ctrl+Alt+Left Arrow

“Tab” out of the Remote Desktop controls to a control in the host program (for example, a button or a text box). Useful when the Remote Desktop controls are embedded in another (host) program.

Note
  • Ctrl+Alt+Break and Ctrl+Alt+End are available in all Remote Desktop sessions, even when you've set up the remote computer to recognize Windows keyboard shortcuts.

Paint keyboard shortcuts

The following table contains keyboard shortcuts for working with Paint.

Press this key
To do this

Ctrl+N

Create a new picture

Ctrl+O

Open an existing picture

Ctrl+S

Save changes to a picture

F12

Save the picture as a new file

Ctrl+P

Print a picture

Alt+F4

Close a picture and its Paint window

Ctrl+Z

Undo a change

Ctrl+Y

Redo a change

Ctrl+A

Select the entire picture

Ctrl+X

Cut a selection

Ctrl+C

Copy a selection to the Clipboard

Ctrl+V

Paste a selection from the Clipboard

Right Arrow

Move the selection or active shape right by one pixel

Left Arrow

Move the selection or active shape left by one pixel

Down Arrow

Move the selection or active shape down by one pixel

Up Arrow

Move the selection or active shape up by one pixel

Esc

Cancel a selection

Delete

Delete a selection

Ctrl+B

Bold selected text

Ctrl++

Increase the width of a brush, line, or shape outline by one pixel

Ctrl+-

Decrease the width of a brush, line, or shape outline by one pixel

Ctrl+I

Italicize selected text

Ctrl+U

Underline selected text

Ctrl+E

Open the Properties dialog box

Ctrl+W

Open the Resize and Skew dialog box

Ctrl+Page Up

Zoom in

Ctrl+Page Down

Zoom out

F11

View a picture in full-screen mode

Ctrl+R

Show or hide the ruler

Ctrl+G

Show or hide gridlines

F10 or Alt

Display keytips

Shift+F10

Show the current shortcut menu

F1

Open Paint Help

WordPad keyboard shortcuts

The following table contains keyboard shortcuts for working with WordPad.

Press this key
To do this

Ctrl+N

Create a new document

Ctrl+O

Open an existing document

Ctrl+S

Save changes to a document

F12

Save the document as a new file

Ctrl+P

Print a document

Alt+F4

Close WordPad

Ctrl+Z

Undo a change

Ctrl+Y

Redo a change

Ctrl+A

Select the entire document

Ctrl+X

Cut a selection

Ctrl+C

Copy a selection to the Clipboard

Ctrl+V

Paste a selection from the Clipboard

Ctrl+B

Make selected text bold

Ctrl+I

Italicize selected text

Ctrl+U

Underline selected text

Ctrl+=

Make selected text subscript

Ctrl+Shift+=

Make selected text superscript

Ctrl+L

Align text left

Ctrl+E

Align text center

Ctrl+R

Align text right

Ctrl+J

Justify text

Ctrl+1

Set single line spacing

Ctrl+2

Set double line spacing

Ctrl+5

Set line spacing to 1.5

Ctrl+Shift+>

Increase the font size

Ctrl+Shift+<

Decrease the font size

Ctrl+Shift+A

Change characters to all capitals

Ctrl+Shift+L

Change the bullet style

Ctrl+D

Insert a Microsoft Paint drawing

Ctrl+F

Find text in a document

F3

Find the next instance of the text in the Find dialog box

Ctrl+H

Replace text in a document

Ctrl+Left Arrow

Move the cursor one word to the left

Ctrl+Right Arrow

Move the cursor one word to the right

Ctrl+Up Arrow

Move the cursor to the line above

Ctrl+Down Arrow

Move the cursor to the line below

Ctrl+Home

Move to the beginning of the document

Ctrl+End

Move to the end of the document

Ctrl+Page Up

Move up one page

Ctrl+Page Down

Move down one page

Ctrl+Delete

Delete the next word

F10

Display keytips

Shift+F10

Show the current shortcut menu

F1

Open WordPad Help

Calculator keyboard shortcuts

The following table contains keyboard shortcuts for working with Calculator.

Press this key
To do this

Alt+1

Switch to Standard mode

Alt+2

Switch to Scientific mode

Alt+3

Switch to Programmer mode

Alt+4

Switch to Statistics mode

Ctrl+E

Open date calculations

Ctrl+H

Turn calculation history on or off

Ctrl+U

Open unit conversion

Alt+C

Calculate or solve date calculations and worksheets

F1

Open Calculator Help

Ctrl+Q

Press the M- button

Ctrl+P

Press the M+ button

Ctrl+M

Press the MS button

Ctrl+R

Press the MR button

Ctrl+L

Press the MC button

%

Press the % button

F9

Press the +/– button

/

Press the / button

*

Press the * button

+

Press the + button

-

Press the – button

R

Press the 1/× button

@

Press the square root button

0-9

Press the number buttons (0-9)

=

Press the = button

.

Press the . (decimal point) button

Backspace

Press the backspace button

Esc

Press the C button

Del

Press the CE button

Ctrl+Shift+D

Clear the calculation history

F2

Edit the calculation history

Up Arrow key

Navigate up in the calculation history

Down Arrow key

Navigate down in the calculation history

Esc

Cancel editing the calculation history

Enter

Recalculate the calculation history after editing

F3

Select Degrees in Scientific mode

F4

Select Radians in Scientific mode

F5

Select Grads in Scientific mode

I

Press the Inv button in Scientific mode

D

Press the Mod button in Scientific mode

Ctrl+S

Press the sinh button in Scientific mode

Ctrl+O

Press the cosh button in Scientific mode

Ctrl+T

Press the tanh button in Scientific mode

(

Press the ( button in Scientific mode

)

Press the ) button in Scientific mode

N

Press the ln button in Scientific mode

;

Press the Int button in Scientific mode

S

Press the sin button in Scientific mode

O

Press the cos button in Scientific mode

T

Press the tan button in Scientific mode

M

Press the dms button in Scientific mode

P

Press the pi button in Scientific mode

V

Press the F-E button in Scientific mode

X

Press the Exp button in Scientific mode

Q

Press the x^2 button in Scientific mode

Y

Press the x^y button in Scientific mode

#

Press the x^3 button in Scientific mode

L

Press the log button in Scientific mode

!

Press the n! button in Scientific mode

Ctrl+Y

Press the y√x button in Scientific mode

Ctrl+B

Press the 3√x button in Scientific mode

Ctrl+G

Press the 10x button in Scientific mode

F5

Select Hex in Programmer mode

F6

Select Dec in Programmer mode

F7

Select Oct in Programmer mode

F8

Select Bin in Programmer mode

F12

Select Qword in Programmer mode

F2

Select Dword in Programmer mode

F3

Select Word in Programmer mode

F4

Select Byte in Programmer mode

K

Press the RoR button in Programmer mode

J

Press the RoL button in Programmer mode

<

Press the Lsh button in Programmer mode

>

Press the Rsh button in Programmer mode

%

Press the Mod button in Programmer mode

(

Press the ( button in Programmer mode

)

Press the ) button in Programmer mode

|

Press the Or button in Programmer mode

^

Press the Xor button in Programmer mode

~

Press the Not button in Programmer mode

&

Press the And button in Programmer mode

A-F

Press the A-F buttons in Programmer mode

Spacebar

Toggles the bit value in Programmer mode

A

Press the Average button in Statistics mode

Ctrl+A

Press the Average Sq button in Statistics mode

S

Press the Sum button in Statistics mode

Ctrl+S

Press the Sum Sq button in Statistics mode

T

Press the S.D. button in Statistics mode

Ctrl+T

Press the Inv S.D. button in Statistics mode

D

Press the CAD button in Statistics mode

Windows Journal keyboard shortcuts

The following table contains keyboard shortcuts for working with Windows Journal.

Press this key
To do this

Ctrl+N

Start a new note

Ctrl+O

Open a recently used note

Ctrl+S

Save changes to a note

Ctrl+Shift+V

Move a note to a specific folder

Ctrl+P

Print a note

Alt+F4

Close a note and its Journal window

Ctrl+Z

Undo a change

Ctrl+Y

Redo a change

Ctrl+A

Select all items on a page

Ctrl+X

Cut a selection

Ctrl+C

Copy a selection to the Clipboard

Ctrl+V

Paste a selection from the Clipboard

Esc

Cancel a selection

Delete

Delete a selection

Ctrl+F

Start a basic find

Ctrl+G

Go to a page

F5

Refresh find results

F5

Refresh the note list

F6

Toggle between a note list and a note

Ctrl+Shift+C

Display a shortcut menu for column headings in a note list

F11

View a note in full-screen mode

F1

Open Journal Help

Windows Help viewer keyboard shortcuts

The following table contains keyboard shortcuts for working with the Help viewer.

Press this key
To do this

Alt+C

Display the Table of Contents

Alt+N

Display the Connection Settings menu

F10

Display the Options menu

Alt+Left Arrow

Move back to the previously viewed topic

Alt+Right Arrow

Move forward to the next (previously viewed) topic

Alt+A

Display the customer support page

Alt+Home

Display the Help and Support home page

Home

Move to the beginning of a topic

End

Move to the end of a topic

Ctrl+F

Search the current topic

Ctrl+P

Print a topic

F3

Move the cursor to the search box

Friday, 16 May 2014

Using Git with Codeplex

http://codeplex.codeplex.com/wikipage?title=Using%20Git%20with%20CodePlex&referringTitle=Source%20control%20clients


Using Git with CodePlex

Git is a distributed version control system that is popular for open source projects. To learn more about how to use Git, the Pro Git site is a great reference. The following is a step-by-step guide to get started using Git for your CodePlex projects.

Step 1: Create your CodePlex project

Log-in to CodePlex and create a project. When selecting the source control, pick Git.

image

Once your project is created, click on the Source Control tab. Click the “Clone” action link to bring up connection details:

image

The clone URL is already selected and you can just type ctrl-C to copy the URL. We’ll be using this later.

Step 2: Set up Git

Download and install the latest Git tools for your operating system:

For the remainder of the guide, we’ll assume that you’re on a Windows system for screenshots.

After you’ve installed Git, you’ll want to provide Git with a username. Git uses this information to keep track of commit history, and CodePlex uses this to match commit history with CodePlex users. To do so, open the Git command line (Git Bash if you chose the default installation options for Git on Windows) and type the following command:

git config --global user.name "CodePlexUsername"

image

Step 3: Clone the repository

Next, you’ll want to set up your repository on your local machine by cloning the repository on CodePlex. In the Git command line, change the directory to a folder where you want to store the source code of your project and then type the following git command:

git clone https://CloneUrl NameOfFolder

where CloneUrl is the Clone URL you noted in Step 1, and NameOfFolder is the name of the folder where you want the source code to be stored. For example:

git clone https://git01.codeplex.com/plastikdreamgit PlastikDreamGit

image

Since you haven’t yet published your project, you’ll have to enter your CodePlex username and password. Because your repository is empty, you’ll get a warning message, but that’s fine.

Step 4: Push to CodePlex

Go to your newly created directory, and add your source code. Stage your changes using git add. For example, let’s say you add a readme file to your directory:

cd PlastikDreamGit

notepad readme.txt

git add readme.txt

image

Commit your changes with a commit message:

git commit -m "my first commit to CodePlex”

image

Push your changes back up to CodePlex.

git push origin master

Type in your CodePlex username and password when prompted.

image

Visit your source code history on the project page and verify that your changes have been pushed by browsing to the source code tab.

image

Thursday, 15 May 2014

Clip.exe and other sysinternals tools


Some brilliant little utilities talked about on the sysinternals session from MS TechEd 2014 here

http://channel9.msdn.com/Events/TechEd/NorthAmerica/2014/DCIM-B340#fbid=

Also check out https://www.virustotal.com/ which has integration into the latest version of sysinternals process explorer. Latest version can be downloaded from http://live.sysinternals.com. Virus total is a good way of using multiple virus scanners rather than just one to check files that you aren't sure about.


Had never heard of clip.exe before… (built into windows by default as well).

C:\Dev\RussellReynolds2010\Main\Solutions\Scripts>clip /?

CLIP

Description:

Redirects output of command line tools to the Windows clipboard.

This text output can then be pasted into other programs.

Parameter List:

/? Displays this help message.

Examples:

DIR | CLIP Places a copy of the current directory

listing into the Windows clipboard.

CLIP < README.TXT Places a copy of the text from readme.txt

on to the Windows clipboard.

More useful tools are:

  1. DU.exe - disk usage check : e.g.
    du -ct | clip.exe
  2. RU.exe - registry usage check : e.g.
    ru -ct -l 3 "HKEY_LOCAL_MACHINE\SOFTWARE\Wow6432Node"

image

Wednesday, 5 March 2014

How to tell if a machine is a virtual machine in Windows

Two methods

1. Start, Run..., cmd.exe, systeminfo.exe, then search for system manufacturer, and if virtual it will be listed as follows :-

If this is a VMware virtual machine, result should be:

System Manufacturer: VMware, Inc.
System Model: VMware Virtual Platform

If this is a Hyper V or a Microsoft Virtual PC machine the result should be like this:

System Manufacturer: Microsoft Corporation
System Model: Virtual Machine

2. Start, Run..., msinfo32.exe - basically a graphical user interface showing much the same information as you get from method 1.

image

How to find the last interactive logons in Windows using PowerShell

Use the following powershell script to find the last users to login to a box since a given date, in this case the 21st April 2022 at 12pm un...