If Visual Studio returns the message "No Files Were found to look in" from the find in files results window, then just do a Ctrl+Alt+PauseBreak key press withing the find results window, and search again.
Monday, 19 November 2012
How to fix the DELL 968 All in one printer, scanner
I came across this issue myself this weekend,
http://en.community.dell.com/support-forums/peripherals/f/3528/p/19298625/20231966.aspx#20231966
Issue
"When trying to scan from printer direct or via all-in-one centre the printer starts the scan and then shuts down/re-starts? Any ideas/seen this before? Thanks Steve"
Solution:
Spent ages searching the web for a solution for this one, but in the end the old "2 - inch drop" was all it really needed...
Just took the two screws out of the left of the flat bed scanner glass section. Then removed the left hand grey panel that snaps in place to the left of these screws on the side of the printer. Then managed to get enough leeway out of the flat bed scanner glass holder, to reach in and give the scanner bar inside a bit of a shake.
Switched off and on again, and the scanner bar reset itself to the correct location, which is, when working correctly, out of site underneath the A4 indicator bar.
Thursday, 15 November 2012
Deep clone of an object by rewinding the Serialization stream
/// <summary>
/// Serializes this class to a json string.
/// </summary>
/// <returns>A JSON string reprsenting a SelectListItem.</returns>
public string ToJson()
{
using (var memoryStream = new MemoryStream())
{
var dataContractJsonSerializer = new DataContractJsonSerializer(typeof(JsonSerializableSelectListItem));
dataContractJsonSerializer.WriteObject(memoryStream, this);
memoryStream.Position = 0;
using (var streamReader = new StreamReader(memoryStream))
{
return streamReader.ReadToEnd();
}
}
}
Wednesday, 14 November 2012
How to Tune Up a Virtual PC
If your VPC seems slow try the following steps to rectify.
1. Have separate drives for your Page File, Host operating system, and VHD file
2.Try defragging again using O&O defrag (http://www.oo-software.com/home/en/products/oodefrag/) instead of the standard windows defrag tool, it works better. The steps below may take some time but should dramatically improve the responsiveness of your VPC. Make sure you have at least as much free space on your drive where the .vhd file is located as the current size of the .vhd. For example, if your .vhd file is 8GB, you need 8GB+ of free space. This much free space is not necessary but will speed up the defrag process. At the very least, try to have a couple gigs of free space before running defrag.
Warning: If you run these steps on a differencing or undo disk, compacting will require you to merge the differencing or undo disk with the original. If you cannot do this, your differencing or undo disk will be twice the size. However, it will most likely still perform better.
Note: Running defrag and precompacting are done inside the VPC. Compacting the disk is done using the Virtual PC Console with the VPC turned off.
Running Defrag (about 30 to 90 minutes depending on how fragmented the drive is)
1. Download the defrag utility and extract the defrag.exe and defragps.dll files to a location on the VPC root drive.
2. Inside the VPC, click Start, and then Run. Type cmd and press ENTER.
3. Change the path to the location where you extracted the defrag.exe and defragps.dll files , i.e. cd c:\tools\defrag and press ENTER.
4. Type defrag -d c: and press ENTER.
5. Let this process go for awhile. At the end your .vhd file will be about twice the size.
Next, you must precompact inside the VPC before compacting the .vhd.
Running Precompact (about 10 minutes)
1. On the VPC menu click CD, then Capture ISO Image.
2. Browse to C:\Program Files\Microsoft Virtual PC\Virtual Machine Additions\
3. Double-click Virtual Machine Precompactor.iso
4. If it doesn't launch, open the D drive in Explorer and double-click precompact.exe.
5. Let this process run. When it's done, shut down the VPC.
Now you can compact the .vhd file using the Virtual PC Console
Compacting the .vhd file (about 30 minutes)
1. Go to the Virtual PC Console, select your VPC, and then click Settings.
2. Select Hard Disk 1.
3. Click Virtual Disk Wizard.
4. Click Next on the first screen of the wizard.
5. Click Edit an existing virtual disk, and then click Next.
6. Click Browse on the Virtual Disk to Edit screen of the wizard and browse to your .vhd file. Select it and click Open.
7. Click Next.
8. Click Compact it (this should be the default), and then click Next.
9. Click Replacing the original file, and then click Next.
10. Click Finish. The disk compacting will start.
Other Performance Tips
- Disable all visual enhancements
1. Right-click My Computer, and then click Properties.
2. On the Advanced tab click the Settings button in the Performance section.
3. On the Visual Effects tab, click Custom then uncheck everything in the list below.
4. Click OK.
- Turn off automatic updates
- Set hardware acceleration to full
1. Right-click the desktop, and then click Properties.
2. On the Settings tab click Advanced.
3. On the Troubleshoot tab, move the Hardware acceleration slider to Full.
4. Click OK
- If you have an old spare 20GB drive lying around, you can use that as an external USB drive and dedicate the entire partition to a single VPC. This will have good performance even with undo disk on as there is virtually little or no fragmentation even over prolonged usage.
- Hard disk paging is bad. Make sure that you balance memory allocation for both the VPC and the Host machine. Allocating too much memory to the VPC can cause your host machine to page to the hard disk and vice versa. With 2GB memory on the host machine, you can allocate 1GB to the VPC with good performance (even with Outlook 2007 and the IE browser running).
- Try the Windows registry optimization with your host machine and VPCs.
- Disable paging of the OS core files (look for the registry keyDisablePagingExecutive inHKLM\SYSTEM\CurrentControlSet\Control\Session Manager\Memory Management and set the value to 0x1)
- Disable the updating of the last access timestamp on the file system (run fsutil behavior set disablelastaccess 1 from the command prompt).
- Reboot. Note the first registry tip is only useful if you have sufficient memory allocated to avoid hard disk paging.
- To improve performance for applications in the VPC (applies to Windows Servers 2003)
- Right click on Computer and select Properties.
- Select the Advanced tab.
- In the Performance section, click on Settings.
- Under the Advanced tab, select best performance for Programs instead ofBackground services. For windows 2003 servers, this is normally set toBackground services.
- Reboot.
- If you have a Core Duo or Core 2 Duo processor on your machine, it should have support for hardware virtualization support. Make sure to do the following:
- Turn on the Virtual Machine Monitor (VMM) in the bios settings. Depending on the bios type, there may be one or two settings related to this. Make sure all are enabled. If you do not see the settings in the bios, it means your hardware manufacturer has not implemented the support.
- Enable Hardware Virtualization support in VirtualPC 2007. In the Virtual PC Console, go to File menu and select Options.
- Under every VPC's settings, you should then be able to set the Hardware Virtualization option. This is only grayed out if you haven't done the previous two steps or if you don't have the right processor.
- In the virtual machine, make sure that you have installed the latest VirtualPC 2007 Virtual Additions if you have not done so.
WCF System.Net.WebException: The underlying connection was closed: The connection was closed unexpectedly
WCF System.Net.WebException: The underlying connection was closed: The connection was closed unexpectedly
If you get the above error when trying to return large numbers of items in a List<T> from a WCF service, then ensure you have set the following behaviour for the dataContractSerializer in both your client and service configuration files..
<dataContractSerializer maxItemsInObjectGraph="2147483646"/>
As in this blog, but with larger number (i.e. max of int)http://processmentor.com/community/blogs/scott_middleton/archive/2007/06/08/169.aspx
Need the settings in service layer and client, set to this.
Service has this
<behavior name="MyService.ServiceImplementation.MyService_Behavior">
<serviceDebug includeExceptionDetailInFaults="true" />
<serviceMetadata httpGetEnabled="true" />
<dataContractSerializer maxItemsInObjectGraph="2147483646"/>
</behavior>
</serviceBehaviors>
<service behaviorConfiguration="MyService.ServiceImplementation.MyService_Behavior"
name="MyService.ServiceImplementation.MyService">
<endpoint binding="basicHttpBinding"bindingConfiguration="BasicHttpBinding_Leads"
bindingNamespace="http://MyService.ServiceContracts/2007/04"
contract="MyService.ServiceContracts.IMyService" />
<endpoint address="mex" binding="mexHttpBinding"contract="IMetadataExchange" />
</service>
</services>
Client has this …
<behaviors>
<endpointBehaviors>
<behavior name="debuggingBehaviour">
<dataContractSerializer maxItemsInObjectGraph="2147483646" />
</behavior>
</endpointBehaviors>
</behaviors>
<endpoint address="http://localhost/Host/Internal/myservice.svc" binding="basicHttpBinding"
bindingConfiguration="BasicHttpBinding_IMyService"contract="LeadsServiceInternal.IMyService" name="BasicHttpBinding_IMyService"
behaviorConfiguration="debuggingBehaviour"
/>
Note you must also set the following two settings on the client maxReceivedMessageSize and maxBufferSize
<binding name="BasicHttpBinding_IMyService" closeTimeout="00:01:00" openTimeout="00:01:00"receiveTimeout="00:10:00" sendTimeout="00:10:00" allowCookies="false" bypassProxyOnLocal="false"
hostNameComparisonMode="StrongWildcard"maxBufferSize="500000000" maxBufferPoolSize="524288" maxReceivedMessageSize="500000000"messageEncoding="Text" textEncoding="utf-8" transferMode="Buffered" useDefaultWebProxy="true">
<readerQuotas maxDepth="32" maxStringContentLength="8192"maxArrayLength="16384" maxBytesPerRead="4096" maxNameTableCharCount="16384"/>
<security mode="None">
<transport clientCredentialType="None"proxyCredentialType="None" realm=""/>
<message clientCredentialType="UserName"algorithmSuite="Default"/>
</security>
</binding>
Tuesday, 6 November 2012
How to remove the encryption from Humax HDR Fox T2 HiDef recordings
Going to give this a try when I have a spare moment,...
http://hummy.tv/forum/threads/black-holes-trail-guide-to-hdr-fox-t2-hacking.354/
Keep watching this post to see how I get on.
So far so good, following these steps
Use FTP to access the Humax file system*
Pull the .hmt file (from the file set that comprises an HiDef recording) onto my PC (using FTP)
Use the Foxy utility to clear the ENC (Encrypted) flag in the .hmt file
Send the .hmt back to the Humax
Copy the HiDef recording to the USB stick decrypted (because the ENC flag was cleared)
Move it to the PC and do something with it
*Settings.. System.. Internet Setting.. FTP Server.. ON
Name: Humax (or whatever you like)
FTP Server: 192.168.1.64 (or whatever your IP address is)
FTP Port: 21 (default)
User ID: humaxftp
Password: 0000 (unless you've changed it)
Passive Mode: NO (very important)
Save Password: YES
Mask Password: YES (doesn't matter)
Anonymous Login: NO
Got Foxy from here...
http://dc356.4shared.com/download/ImQij8V5/foxy.zip?tsid=20121106-223151-d7dcfcfe
Further updates:
Seems like 4gb is FAT32 limit. Managed to get whole file off the box using ftp, but don't think that the encryption is removed when you copy it via ftp, as the 8gb file now doesn't play in vlc player for some reason.
The ftp copy to NTFS didn't work,

but then I discovered this post which I'm resting all hopes on now...
Samsung AllShare Software = File transfer no encryption! -http://hummy.tv/forum/threads/samsung-allshare-software-file-transfer-no-encryption.2449/
All share can be downloaded here - http://www.samsung.com/global/allshare/pcsw/download/AllSharePCSW.exe - Note to get round the hotfix loop in the installer, Right click this exe and select run as administrator. Actually you may have to run the install twice, as it appears to get stuck in the hotfix loop the first time you run it. Use Task manager to end the install process, and then run it again using run as administrator option. Then RESTART YOUR COMPUTER!!!
Main software page for it here - http://www.samsung.com/global/allshare/pcsw/
Important Note: In order to get Samsung All Share to see your Humax box, then on the Humax box you must enable content share, under the Internet settings menu option for the box.
Final update:
Finally managed to get it working. Used ftp://humaxftp:0000@192.168.x.x in windows explorer on Windows 7 , and create this as a favourite location. Used the foxy app mentioned above to crack open the .hmt file and upload it back via this ftp link in windows explorer.
Then used the humax menu to copy the recording into a folder on the machine, before restarting the all share application on my laptop.
Then used the samsung all share application to copy the .ts HD file over to my computer as an avi file, whilst another machine was copying the .ts file over via the FTP link as well. P.S. Works best with direct link into your router rather than over wifi as transfer speeds are faster over LAN cable of course.
Now just waiting to see if the full 8gb comes down via the all share interface..... BOOM! It worked.
Now just waiting to see if the full 8gb comes down via the all share interface..... BOOM! It worked.
SQL to drop and recreate foreign keys
SELECT 'To' 'Direction',
OBJECT_NAME(sfk.constraint_object_id) 'ConstraintName',
OBJECT_NAME(parent_object_id) 'ConstrainedTable',
psc.name 'ConstrainedColumn',
OBJECT_NAME(referenced_object_id) 'ConstrainingTable',
csc.name 'ConstraingColumn',
'ALTER TABLE ' + QUOTENAME(OBJECT_SCHEMA_NAME(parent_object_id)) + '.' + QUOTENAME(OBJECT_NAME(parent_object_id)) + ' WITH NOCHECK ADD CONSTRAINT ' + QUOTENAME(OBJECT_NAME(sfk.constraint_object_id)) + ' FOREIGN KEY(['+psc.name + ']) REFERENCES ' + OBJECT_NAME(referenced_object_id) +' ([' + csc.name +'])' AS [CreateScript] ,
'ALTER TABLE ' + QUOTENAME(OBJECT_SCHEMA_NAME(parent_object_id)) + '.' + QUOTENAME(OBJECT_NAME(parent_object_id)) + ' DROP CONSTRAINT ' + QUOTENAME(OBJECT_NAME(sfk.constraint_object_id)) AS [DropScript]
FROM sys.foreign_key_columns sfk
INNER JOIN sys.columns psc ON psc.column_id = sfk.parent_column_id
AND sfk.parent_object_id = psc.object_id
INNER JOIN sys.columns csc ON csc.column_id = sfk.referenced_column_id
AND sfk.referenced_object_id = csc.object_id
WHERE OBJECT_NAME(sfk.constraint_object_id) IN
(
SELECT CONSTRAINT_NAME
FROM INFORMATION_SCHEMA.REFERENTIAL_CONSTRAINTS C
)
Thursday, 1 November 2012
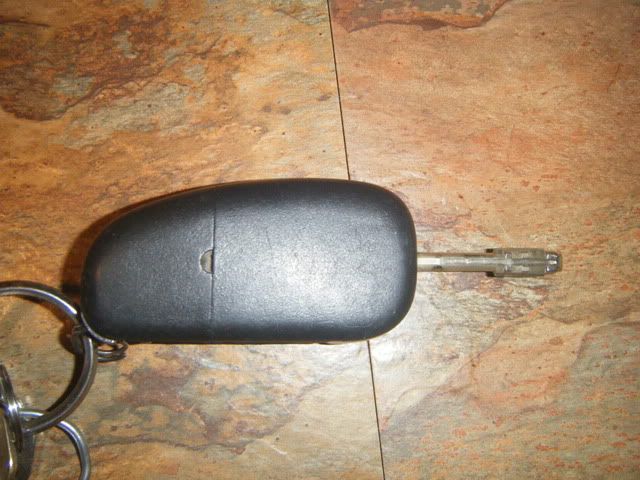
How to replace the battery in a Jag X-Type Key Fob, and reprogramming the key fob
http://www.jaguarforums.com/forum/s-type-s-type-r-supercharged-v8-15/key-fob-battery-replacement-write-up-faq-54380/
NOTE: MAKE SURE YOU DO THIS SOON AFTER THE BATTERY DIES ON YOUR KEY FOB. IF YOU LEAVE IT TOO LONG THE MEMORY ON THE CHIP WILL BE WIPED, AND JUST REPLACING THE BATTERY IN THE KEY FOB WONT BE ENOUGH!!!
See the reprogramming information further down this page for the solution for reprogramming the key fob should this happen.
First you can use the small flat head in this small tab to pull the fob into two pieces.
It should look like this after getting it apart.
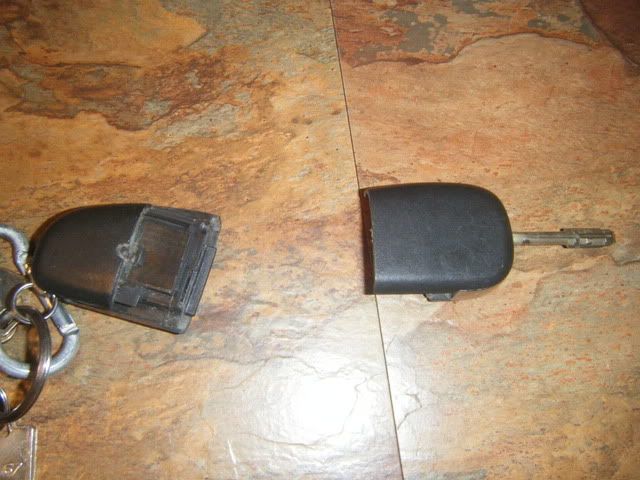
Then taking the part with the buttons on it you will see a spot to use the flat head to start to work your way around to make that come apart into 2 pieces.

Once that's in two pieces you will see a small screw on the circuit board in the top left corner in the pic. The small flat head will allow you to unscrew this.

Then you will be able to pull the circuit board out and will allow you access to the battery.
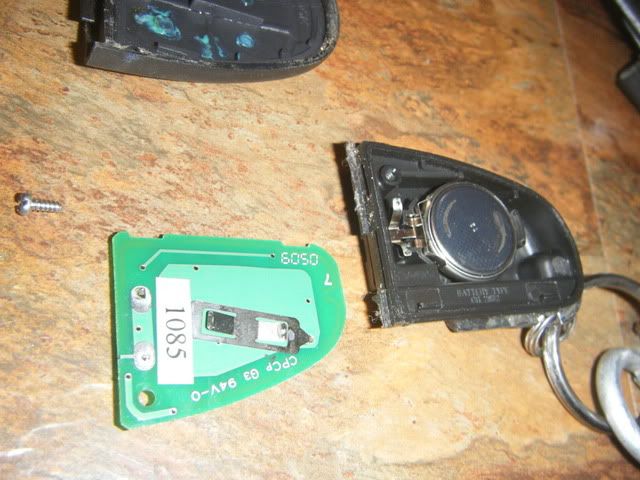
Now you just use the flat head again to help pull the battery out and replace. Note: At this step I also used a cotton bud doused in some alcohol (Rum as there was some in the cupboard) to clean the contacts on the circuit board.
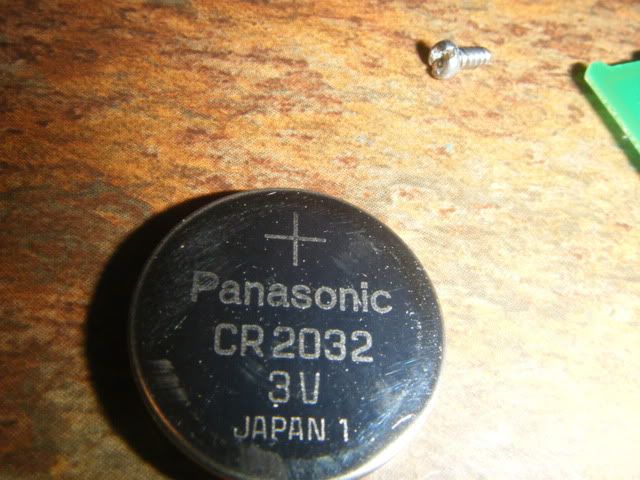
Once the new battery is in its just a matter of screwing the circuit board back in and everything else will just click back together. Now you have a fresh battery. You shouldn't have to reprogram the key fob it should just start working again if the battery was dead so just click the buttons to test. However if the battery has been dead a long while you will most likely have to reprogram the key fob.
Hope this helps some people out.
To program the remote transmitter(s) without using Worldwide Diagnostic System (WDS), follow the procedure outlined below.
Note: When carrying out the alarm remote programming, ensure that
no other vehicles within a 50 meter radius are undergoing the same
programming procedure, as this could affect the programming
operation.
Note: All required remote transmitters must be available when carrying out this procedure.
1. Open driver's door using the metal part of the key.
2. Turn the ignition switch to the 'auxiliary' position, then turn the ignition switch to the 'ON' position and back to the 'auxiliary' position four times quickly (about one turn each half a second).
Note: A chime from the Generic Electronic Module (GEM) will indicate
programming status has been enabled.
3. Turn the ignition switch to 'OFF' position.
4. Remove the key from the ignition switch.
5. To program the transmitter, press any key within 10 seconds.
Note: If the remote transmitter has been accepted, the GEM will
make a chime.
6. If any other remote transmitters are to be programmed, press any button once on each transmitter within 10 seconds.
Note: A maximum of four remote transmitters can be programmed to the vehicle at any one time.
7. Close driver door.
NOTE: MAKE SURE YOU DO THIS SOON AFTER THE BATTERY DIES ON YOUR KEY FOB. IF YOU LEAVE IT TOO LONG THE MEMORY ON THE CHIP WILL BE WIPED, AND JUST REPLACING THE BATTERY IN THE KEY FOB WONT BE ENOUGH!!!
See the reprogramming information further down this page for the solution for reprogramming the key fob should this happen.
Replacing the battery
Here is just a quick write-up on how to replace the battery in the key fob. The only tool you need is a small flat head screwdriver.First you can use the small flat head in this small tab to pull the fob into two pieces.
It should look like this after getting it apart.
Then taking the part with the buttons on it you will see a spot to use the flat head to start to work your way around to make that come apart into 2 pieces.
Once that's in two pieces you will see a small screw on the circuit board in the top left corner in the pic. The small flat head will allow you to unscrew this.
Then you will be able to pull the circuit board out and will allow you access to the battery.
Now you just use the flat head again to help pull the battery out and replace. Note: At this step I also used a cotton bud doused in some alcohol (Rum as there was some in the cupboard) to clean the contacts on the circuit board.
Once the new battery is in its just a matter of screwing the circuit board back in and everything else will just click back together. Now you have a fresh battery. You shouldn't have to reprogram the key fob it should just start working again if the battery was dead so just click the buttons to test. However if the battery has been dead a long while you will most likely have to reprogram the key fob.
Hope this helps some people out.
Reprogramming the key fob
Action:To program the remote transmitter(s) without using Worldwide Diagnostic System (WDS), follow the procedure outlined below.
Note: When carrying out the alarm remote programming, ensure that
no other vehicles within a 50 meter radius are undergoing the same
programming procedure, as this could affect the programming
operation.
Note: All required remote transmitters must be available when carrying out this procedure.
1. Open driver's door using the metal part of the key.
2. Turn the ignition switch to the 'auxiliary' position, then turn the ignition switch to the 'ON' position and back to the 'auxiliary' position four times quickly (about one turn each half a second).
Note: A chime from the Generic Electronic Module (GEM) will indicate
programming status has been enabled.
3. Turn the ignition switch to 'OFF' position.
4. Remove the key from the ignition switch.
5. To program the transmitter, press any key within 10 seconds.
Note: If the remote transmitter has been accepted, the GEM will
make a chime.
6. If any other remote transmitters are to be programmed, press any button once on each transmitter within 10 seconds.
Note: A maximum of four remote transmitters can be programmed to the vehicle at any one time.
7. Close driver door.
Subscribe to:
Posts (Atom)
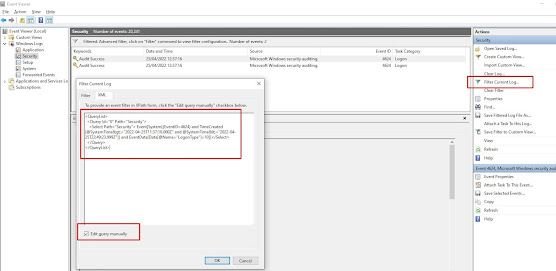
How to find the last interactive logons in Windows using PowerShell
Use the following powershell script to find the last users to login to a box since a given date, in this case the 21st April 2022 at 12pm un...
-
http://www.jaguarforums.com/forum/s-type-s-type-r-supercharged-v8-15/key-fob-battery-replacement-write-up-faq-54380/ NOTE: MAKE SURE YOU DO ...
-
Buy this battery http://www.watchbattery.co.uk/shop/products/BB-ML2032.shtml Open the battery cover on the back of the keyboard, you’ll need...

