Thursday, 9 October 2014

How to remove history from chrome for a single site

1. Open the chrome://history/ page in Google chrome, and search for the site that you wish to delete history from.

image

2. Inspect the chrome://history/ page in F12 dev tools, then change the frame selected to target this history frame

image

3. Run the following javascript lines from the Console window (Esc)...

var checkBoxes =document.getElementsByClassName('entry-box');

for (i = 0; i< s.length; i++) {checkBoxes[i].childNodes[0].checked = true;}

document.getElementById('remove-selected').disabled = false;

4. Now just click the Remove selected Items button that should be enabled.

image

Alternatively as my colleague Joseph pointed out, you can just use this browser extension if you like,...

https://chrome.google.com/webstore/detail/better-history/obciceimmggglbmelaidpjlmodcebijb?hl=en

Search your history, then this will let you delete the search results.

Thursday, 18 September 2014

Watermarks in ASP.NET MVC 4

...using the jquery.overlabel plugin

1. Stick a DisplayName attribute for the watermark on your model property

[RequiredIf("Mode", UnderOfferModelMode.SetUnderOffer, ErrorMessage = "Please enter a comment")]

[DisplayName("Please enter your comment text here")]

public string UnderOfferComment { get; set; }

2. Add an Html.LabelFor and an Html.TextAreaFor your model property

3. Import the jquery.overlabel.js by including "overlabel" in your require imports

4. Add a line in the document.ready to call the .overlabel() method on the label selector (or use a class selector as I have)

clip_image001

5. In your css then you just need

label.overlabel {

position: absolute;

margin-left: 70px;

margin-top: 10px;

z-index: 1;

color: #999;

}

And you end up with a lovely little unobtrusive watermark that doesn't interfere with your model validation in anyway.

Wednesday, 13 August 2014

Hyperlinks not opening immediately from emails

If this happens then follow the steps below to fix it...

To reset Internet Explorer Settings, follow these steps:

  1. Close all Internet Explorer windows.
  2. Click Start, type inetcpl.cpl in the Search box and then click inetcpl.cpl on the Programs list.
    The Internet Options dialog box appears.


    Note for Windows XP, click Start, click Run, type inetcpl.cpl in the Open box, and then click OK.

  3. Click the Advanced tab.
  4. Under Reset Internet Explorer Settings, click Reset. Then, click Reset again.
  5. When Internet Explorer finishes resetting, click Close in the Reset Internet Explorer Settings dialog box.
  6. Start Internet Explorer again.
    Your changes will take effect the next time that you open Internet Explorer.


Tuesday, 12 August 2014

Resharper equivalent for clipboard ring

Assigned Ctrl+Shift+V to ReSharper.ReSharper_PasteMultiple instead as I find this to be a much more useful interface than trying to guess what the last 10 items on your clipboard are.
Plus it supports way more items than just the 10 you get with Visual Studio.
image

Wednesday, 6 August 2014

How to open Visio documents in Visio Viewer when you already have Visio installed

  1. Just delete the HKEY_CLASSES_ROOT\.vsd key from you registry root
  2. Enter the below registry text into a .reg file and double click to add it into your registry
  3. In internet explorer choose File, Open, (select all files filter), and then select your .vsd file, and then allow the activex control to run.
  4. Also to remove the warning from IE each time you open a .vsd file, set the following security option in your Internet options, Advanced dialog...
    image


Windows Registry Editor Version 5.00

[HKEY_CLASSES_ROOT\.vsd]
@="VisioViewer.Viewer"
"Content Type"="application/vnd.ms-visio.viewer"

[HKEY_CLASSES_ROOT\.vsd\PersistentHandler]
@="{FAEA5B46-761B-400E-B53E-E805A97A543E}"

[HKEY_CLASSES_ROOT\.vsd\shellex]

[HKEY_CLASSES_ROOT\.vsd\shellex\{8895b1c6-b41f-4c1c-a562-0d564250836f}]
@="{21E17C2F-AD3A-4b89-841F-09CFE02D16B7}"

Tuesday, 8 July 2014

Kendo DropDownList popup keep open alternative code using list property

Should you ever have the need to keep a kendo drop down list open using typescript, then the following example is how you should go about it with the latest kendo libraries that we're referencing

Note: The benefits of doing it this way is that you can strongly type all the typescript code, instead of relying on an undocumented extension property called popup off the drop down list control.

Typescript code:

export class AssignmentDashboard extends Base.HomePageBase {

private filterEventsDdLInitialized = false;

public filterEventsDdlInitialize: () => void = () => {

if (this.filterEventsDdLInitialized === false) {

var filterEventsDdl: kendo.ui.DropDownList = $("#viewEventListFilters").data("kendoDropDownList");

if (!this.isDefined(filterEventsDdl)) {

alert('viewEventListFilters drop down list widget not found');

return;

}

filterEventsDdl.list.on("mousedown", "*", (e: JQueryEventObject) => {

this.lastTarget = <HTMLElement>e.currentTarget;

});

filterEventsDdl.bind("close", (e: kendo.ui.DropDownListCloseEvent) => {

if ($.contains(e.sender.list[0], this.lastTarget)) {

e.preventDefault();

}

this.lastTarget = document.body;

//e.preventDefault(); // comment out for prod. use this to lock ddl during debugging/editing.

});

filterEventsDdl.list.on("click", "input", this.filterOptionChangeHandler);

this.filterEventsDdLInitialized = true;

}

}

CSHTML code:

attach the filterEventsDdlInitialize class method to the e.open event of the drop down in the cshtml… e.g.

.Events(e =>

{

e.Open("$(document).data('assignmentDashboardContext').filterEventsDdlInitialize");

})

e.g.

@(Html.Kendo().DropDownList()

.Name("viewEventListFilters")

.HtmlAttributes(new { style = "width: 240px;" })

.Height(410)

.BindTo(Model.FilterOptionsBinder)

.Text("Events")

.Value("Events")

.Events(e =>

{

e.Open("$(document).data('assignmentDashboardContext').filterEventsDdlInitialize");

})

.Template(tempHolder)

)

Friday, 20 June 2014

Fingerprint css in MVC web sites

http://madskristensen.net/post/cache-busting-in-aspnet

Optimizing for website performance includes setting long expiration dates on our static resources, such s images, stylesheets and JavaScript files. Doing that tells the browser to cache our files so it doesn’t have to request them every time the user loads a page. This is one of the most important things to do when optimizing websites.

In ASP.NET on IIS7+ it’s really easy. Just add this chunk of XML to the web.config’s <system.webServer> element:

<staticcontent>
<clientcache cachecontrolmode="UseMaxAge" cachecontrolmaxage="365.00:00:00" />
</staticcontent>

The above code tells the browsers to automatically cache all static resources for 365 days. That’s good and you should do this right now.

The issue becomes clear the first time you make a change to any static file. How is the browser going to know that you made a change, so it can download the latest version of the file? The answer is that it can’t. It will keep serving the same cached version of the file for the next 365 days regardless of any changes you are making to the files.

Fingerprinting


The good news is that it is fairly trivial to make a change to our code, that changes the URL pointing to the static files and thereby tricking the browser into believing it’s a brand new resource that needs to be downloaded.

Here’s a little class that I use on several websites, that adds a fingerprint, or timestamp, to the URL of the static file.

using System; 
using System.IO;
using System.Web;
using System.Web.Caching;
using System.Web.Hosting;

public class Fingerprint
{
public static string Tag(string rootRelativePath)
{
if (HttpRuntime.Cache[rootRelativePath] == null)
{
string absolute = HostingEnvironment.MapPath("~" + rootRelativePath);

DateTime date = File.GetLastWriteTime(absolute);
int index = rootRelativePath.LastIndexOf('/');

string result = rootRelativePath.Insert(index, "/v-" + date.Ticks);
HttpRuntime.Cache.Insert(rootRelativePath, result, new CacheDependency(absolute));
}

return HttpRuntime.Cache[rootRelativePath] as string;
}
}

All you need to change in order to use this class, is to modify the references to the static files.

Modify references


Here’s what it looks like in Razor for the stylesheet reference:

<link rel="stylesheet" href="@Fingerprint.Tag("/content/site.css")" />

…and in WebForms:

<link rel="stylesheet" href="<%=Fingerprint.Tag(" />content/site.css") %>" />

The result of using the FingerPrint.Tag method will in this case be:

<link rel="stylesheet" href="/content/v-634933238684083941/site.css" />

Since the URL now has a reference to a non-existing folder (v-634933238684083941), we need to make the web server pretend it exist. We do that with URL rewriting.

URL rewrite


By adding this snippet of XML to the web.config’s <system.webServer> section, we instruct IIS 7+ to intercept all URLs with a folder name containing “v=[numbers]” and rewrite the URL to the original file path.

<rewrite>
<rules>
<rule name="fingerprint">
<match url="([\S]+)(/v-[0-9]+/)([\S]+)" />
<action type="Rewrite" url="{R:1}/{R:3}" />
</rule>
</rules>
</rewrite>

You can use this technique for all your JavaScript and image files as well.

The beauty is, that every time you change one of the referenced static files, the fingerprint will change as well. This creates a brand new URL every time so the browsers will download the updated files.

FYI, you need to run the AppPool in Integrated Pipeline mode for the <system.webServer> section to have any effect.

Building a JavaScript Event Aggregator using TypeScript


http://www.wintellect.com/blogs/jlikness/building-a-javascript-event-aggregator-using-typescript

Jeremy Likness' Blog

Building a JavaScript Event Aggregator using TypeScript

The event aggregator is a useful mechanism for decoupling notifications. Typically, notifications happen through events. In JavaScript, an event is a notification that happens as the result of an action. You can think of it as a notification that is triggered by something. We call the triggering of the event “raising” the event. Events are a simple notification mechanism that contain a collection of handlers. A handler is really just a function that is called when the event is raised. The event may pass some information to the handler, and your function must react to the event.

Perhaps the most popular event in JavaScript is the “click” event. Events can be wired directly in HTML markup, like this:

<a id="homeLink" href="#home" onclick="alert('Go Home!')">Go Home</a>

A more sophisticated way to provide a handler is to do something like this:

var homeLink = document.getElementById('homeLink');
homeLink.onclick = function(e) {
   alert('Go Home!');
}

Here, the handler is assigned to the onclick function that is raised when the link is clicked.

Events are the core of interacting with HTML DOM. Many JavaScript frameworks provide a mechanism for you to extend JavaScript objects to participate in the event model as well. For example, using Backbone’s events you can register to an event that is triggered by a business object, and raise the event from the business object. This allows you to have events that are not tied to specific user actions in the DOM.

The event model makes sense for most cases. One complaint about this model is that it does force coupling. To register for an event, you must have a reference to the object or DOM element that triggers the event. You provide your handler directly to the source of the event. This is appropriate in most cases, because coupling isn’t always a bad thing. A common example of this is entering search criteria for a grid and pressing the search button.

The search criteria is often bound to a view model that contains properties for the search criteria. The search event will fire, and this will trigger a call to a service that passes the criteria and returns the results for the grid. While these actions should be decoupled to an extent (i.e. the view model will remain free of view-specific code to keep it testable and maintainable, and the service call is probably implemented in a separate function), it makes sense for the view model to be aware of the service because there is a direct action/reaction taking place – the action is to request the list of results and the reaction is to receive the list. Decoupling these (for example, simply sending a message that states, “I want data” and then having a completely separate mechanism to listen for the message “I have data”) can make the code confusing to follow, hard to troubleshoot and difficult to maintain.

There are a few scenarios such as cross-module communication and extensibility that make more sense from a highly decoupled perspective. For cross-module communication, for example, you may want to use an event aggregator. One module may focus on the process of searching for items and adding them to a shopping cart, while another module handles tracking the shopping cart. You may eventually add a third module and extend the application by providing a shipping estimation calculator that responds with a new total whenever items are added to the cart. In these cases, you can decouple the modules by sending a generic message that an item is selected, then build the other modules to receive that message and act on it.

To facilitate this, you can use the publisher/subscriber model as implemented by the event aggregator. The concept of an event aggregator is simple: you have a “broker” that manages notifications. All modules know about the broker, but not about each other, and publish messages to the broker. The broker maintains a list of subscriptions (modules “subscribe” to messages) and notifies the subscribers when a message is listed.

This pattern is a perfect example of how TypeScript can be used to build a facility without compromising the flexibility of the JavaScript language. TypeScript is a superset of JavaScript, so all valid JavaScript is also valid TypeScript code. Instead of trying to replace the language or force typing, TypeScript allows you to define contracts and types where they make sense and are expected, but retain full control over the power of the dynamic and function-oriented aspects of JavaScript.

I decided to start by developing an MVVM module I’ll call Gom because it’s the glue that we can use on the client to hold things together. I’m exploring this solely as a learning exercise as there are plenty of fantastic frameworks like KnockoutJS, AngularJS, and the framework built into Kendo UI that handle data-binding and enterprise concerns. In TypeScript, a module is like a namespace and can be simply defined like this:

module Gom {
}

That’s it – now I can start defining classes and methods that are specific to my module. The first thing I want to keep track of is subscriptions. A subscription is simply a callback – it’s a function that should be called when a notification is sent (or an event is raised). In this model, I’ll give the subscription an identifier as well so the listener can unsubscribe if it is no longer interested in the notification:

class Subscription {
    constructor (           
        public id: number,
        public callback: (payload?: any) => void) {
    }       
}

Note the signature for a function can be declared using a lambda-style expression, showing the parameters that are expected and the return type. The implementation of the class in JavaScript is a self-invoking function scoped to the Gom module:

var Subscription = (function () {
    function Subscription(id, callback) {
        this.id = id;
        this.callback = callback;
    }
    return Subscription;
})();   

What’s nice is that I don’t have to worry about things like creating a constructor or wrapping the function – TypeScript does that for me. Next, I’ll create an interface for a message. Think of a message as a “channel.” I can send a type of message (giving it a name), and I’ll keep track of all subscriptions for that message. It is assumed that both publishers and subscribers understand how to deal with the content of messages that have the same name. In TypeScript, interfaces have no actual JavaScript implementation. They simply provide compile-time checks, design-time auto-completion and help keep your code clean and make it easier to build and maintain.

interface IMessage {
    subscribe(callback: (payload?: any) => void): number;
    unSubscribe(id: number): void;
    notify(payload?: any): void;
}

The subscription takes a callback which has the signature of expecting any type of object (optional) and returning nothing (this is the function the listener will implement) and returns a number (the token for the subscription so it can be unsubscribed). The unsubscribe function takes the identifier, and the notify function takes an optional payload.

We can now implement the interface:

class Message implements IMessage {

    private _subscriptions: Subscription[];
    private _nextId: number;

    constructor (public message: string) {
        this._subscriptions = [];
        this._nextId = 0;
    }

    public subscribe(callback: (payload?: any) => void) {
        var subscription = new Subscription(this._nextId++, callback);
        this._subscriptions[subscription.id] = subscription;
        return subscription.id;
    }

    public unSubscribe(id: number) {
        this._subscriptions[id] = undefined;                       
    }

    public notify(payload?: any) {
        var index;
        for (index = 0; index < this._subscriptions.length; index++) {
            if (this._subscriptions[index]) {
                this._subscriptions[index].callback(payload);
            }
        }
    }
}

Notice how the message maintains it’s own list of subscriptions. For efficiency, it keeps the subscriptions in their assigned slots and simply sets them to undefined when they are unsubscribed. A notification simply iterates through the array and sends the payload to the subscriptions. Empty slots are skipped.

The implementation in JavaScript is again as self-invoking function that scopes the variables appropriately. Note the public functions are class-wide and therefore assigned to the underlying prototype for the object:

var Message = (function () {
    function Message(message) {
        this.message = message;
        this._subscriptions = [];
        this._nextId = 0;
    }
    Message.prototype.subscribe = function (callback) {
        var subscription = new Subscription(this._nextId++, callback);
        this._subscriptions[subscription.id] = subscription;
        return subscription.id;
    };
    Message.prototype.unSubscribe = function (id) {
        this._subscriptions[id] = undefined;
    };
    Message.prototype.notify = function (payload) {
        var index;
        for(index = 0; index < this._subscriptions.length; index++) {
            if(this._subscriptions[index]) {
                this._subscriptions[index].callback(payload);
            }
        }
    };
    return Message;
})();   

All of the classes so far have been scoped internally to the module. This means they are local to the self-invoked function that defines the module, but not available externally. You can’t directly create a Message instance. Instead, I expose an EventManager class. This isexported in TypeScript so it can be referenced externally from the module. The event manager handles a list of messages and exposes the various operations:

export class EventManager {

    private _messages: any;

    constructor () {
        this._messages = {};
    }

    subscribe(message: string, callback: (payload?: any) => void ) {
        var msg: IMessage;           
        msg = this._messages[message] ||
            <IMessage>(this._messages[message] = new Message(message));
                      
        return msg.subscribe(callback);                       
    }
       
    unSubscribe(message: string, token: number) {           
        if (this._messages[message]) {
            (<IMessage>(this._messages[message])).unSubscribe(token);
        }
    }

    publish(message: string, payload?: any) {
        if (this._messages[message]) {
            (<IMessage>(this._messages[message])).notify(payload);
        }
    }
}

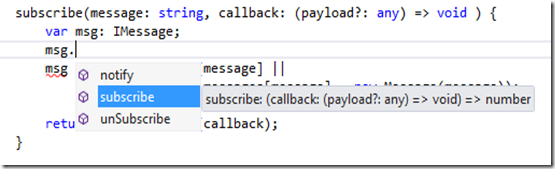
Now you can see some more powerful TypeScript features at work. The subscriptions simply exist as properties on the main _messages object. When a subscription comes in, the existence of the Message instance for that subscription is checked, otherwise it is created. The <IMessage> casts the result so you can use auto-complete (type msg and hit the period and you’ll see the list of available methods). This example passes the subscription through to the message.

To unsubscribe the function first checks that the message exists, and only if it does, it passes the token down to unsubscribe. Finally, the publication checks for the existence of subscriptions (if no one subscribed, there is no one to notify) and then passes the payload through. The generated JavaScript (note the assignment to the Gom module so it is available for external consumption):

var EventManager = (function () {
    function EventManager() {
        this._messages = {
        };
    }
    EventManager.prototype.subscribe = function (message, callback) {
        var msg;
        msg = this._messages[message] || (this._messages[message] = new Message(message));
        return msg.subscribe(callback);
    };
    EventManager.prototype.unSubscribe = function (message, token) {
        if(this._messages[message]) {
            ((this._messages[message])).unSubscribe(token);
        }
    };
    EventManager.prototype.publish = function (message, payload) {
        if(this._messages[message]) {
            ((this._messages[message])).notify(payload);
        }
    };
    return EventManager;
})();
Gom.EventManager = EventManager;  

Now I can demonstrate the pub/sub model through a simple page. Here is the full mark-up. The TypeScript is compiled to a corresponding JavaScript file that is referenced.

<!DOCTYPE html>
<html xmlns="http://www.w3.org/1999/xhtml">
<head>
    <title>GOM - MVVM Glue for JavaScript</title>   
</head>
<body>
    <div><input id="txtMessage" value=""/></div>
    <div><input type="button" id="btnSubmit" value="Publish"/></div>
    <div>
        <h1 id="header">Pub/Sub Example</h1>
        <p id="paragraph">Type a message in the box and click "publish" to continue.</p>
    </div>
    <script src="Scripts/GomEvents.js"></script>
    <script type="text/javascript">
        var events = new Gom.EventManager();
       
        var token = events.subscribe("message", function(msg) {
            document.getElementById("header").innerText = msg;
        });

        (function(tok) {
            events.subscribe("message", function(msg) {
                document.getElementById("paragraph").innerText = msg;
                events.unSubscribe("message", tok);
            });
        })(token);       

        document.getElementById("btnSubmit").onclick = function() {
            events.publish("message", document.getElementById("txtMessage").value);
        };

    </script>
</body>
</html>

This is a very simple example but it illustrates the working event aggregator. Two subscriptions are made, one that will listen for the message called “message” and update an H1 tag, another that listens to the same message and updates the P tag. The second listener will also try to unsubscribe the first listener. The result is that the first message will update the H1 and P tags, while subsequent messages only update the P tag. Finally, a click event is wired to obtain the contents of the text box and publish the message. This is of course a contrived example to illustrate the implementation.

While you would never use the event aggregator for such as simple case, let’s go back to the original scenario of a shopping cart. The payload can be any type of object. In the shopping cart example, you could serialize an item added to the cart into JSON, then publish a “cartAdded” message with that as the payload. The cart module could then receive and track that item, while the shipping estimation module receives the same payload and uses it to estimate the shipping costs.

I believe TypeScript made it easier to design and build the implementation by using a class structure, while still generating clean JavaScript code. The resulting code can be consumed by any other code and doesn’t require TypeScript. More importantly, however, developers in a large enterprise project will now be able to reference the module and consume the contents with full IntelliSense, making it a lot easier to explore APIs and understand what they expect. Here’s an example of auto-completion in the IDE – note that I get a list of available functions as well as their complete signature:
typescriptintellisense

You can download the source for this post here. I leave you with this working example:

Click here to view in a new window.

Enjoy!

Upgrading an ASP.NET MVC 3 Project to ASP.NET MVC 4

http://www.asp.net/whitepapers/mvc4-release-notes#_Toc303253806


ASP.NET MVC 4 can be installed side by side with ASP.NET MVC 3 on the same computer, which gives you flexibility in choosing when to upgrade an ASP.NET MVC 3 application to ASP.NET MVC 4.

The simplest way to upgrade is to create a new ASP.NET MVC 4 project and copy all the views, controllers, code, and content files from the existing MVC 3 project to the new project and then to update the assembly references in the new project to match any non-MVC template included assembiles you are using. If you have made changes to the Web.config file in the MVC 3 project, you must also merge those changes into the Web.config file in the MVC 4 project.

To manually upgrade an existing ASP.NET MVC 3 application to version 4, do the following:

  1. In all Web.config files in the project (there is one in the root of the project, one in the Views folder, and one in the Views folder for each area in your project), replace every instance of the following text (note: System.Web.WebPages, Version=1.0.0.0 is not found in projects created with Visual Studio 2012):
    System.Web.Mvc, Version=3.0.0.0
    System.Web.WebPages, Version=1.0.0.0
    System.Web.Helpers, Version=1.0.0.0
    System.Web.WebPages.Razor, Version=1.0.0.0

    with the following corresponding text:

    System.Web.Mvc, Version=4.0.0.0
    System.Web.WebPages, Version=2.0.0.0
    System.Web.Helpers, Version=2.0.0.0
    System.Web.WebPages.Razor, Version=2.0.0.0

  2. In the root Web.config file, update the webPages:Version element to "2.0.0.0" and add a new PreserveLoginUrl key that has the value "true":
    <appSettings>
    <add key="webpages:Version" value="2.0.0.0" />
    <add key="PreserveLoginUrl" value="true" />
    </appSettings>

  3. In Solution Explorer, right-click on the References and select Manage NuGet Packages. In the left pane, select Online\NuGet official package source, then update the following:

    • ASP.NET MVC 4
    • (Optional) jQuery, jQuery Validation and jQuery UI
    • (Optional) Entity Framework
    • (Optonal) Modernizr

  4. In Solution Explorer, right-click the project name and then select Unload Project. Then right-click the name again and select EditProjectName.csproj.
  5. Locate the ProjectTypeGuids element and replace {E53F8FEA-EAE0-44A6-8774-FFD645390401} with {E3E379DF-F4C6-4180-9B81-6769533ABE47}.
  6. Save the changes, close the project (.csproj) file you were editing, right-click the project, and then select Reload Project.
  7. If the project references any third-party libraries that are compiled using previous versions of ASP.NET MVC, open the root Web.config file and add the following three bindingRedirect elements under the configuration section:
    <configuration>
    <!--... elements deleted for clarity ...-->

    <runtime>
    <assemblyBinding xmlns="urn:schemas-microsoft-com:asm.v1">
    <dependentAssembly>
    <assemblyIdentity name="System.Web.Helpers"
    publicKeyToken="31bf3856ad364e35" />
    <bindingRedirect oldVersion="1.0.0.0" newVersion="2.0.0.0"/>
    </dependentAssembly>
    <dependentAssembly>
    <assemblyIdentity name="System.Web.Mvc"
    publicKeyToken="31bf3856ad364e35" />
    <bindingRedirect oldVersion="1.0.0.0-3.0.0.0" newVersion="4.0.0.0"/>
    </dependentAssembly>
    <dependentAssembly>
    <assemblyIdentity name="System.Web.WebPages"
    publicKeyToken="31bf3856ad364e35" />
    <bindingRedirect oldVersion="1.0.0.0" newVersion="2.0.0.0"/>
    </dependentAssembly>
    </assemblyBinding>
    </runtime>
    </configuration>

Thursday, 19 June 2014

Batch file parameters

http://www.microsoft.com/resources/documentation/windows/xp/all/proddocs/en-us/percent.mspx?mfr=true

REM   The next lines to change directory just works.
REM
REM Set environ variable for the BAT current DIR
set batchDirectory=%~dp0
REM Strip away the trailing backslash
if "%batchDirectory:~-1%"=="\" set batchDirectory=%batchDirectory:~0,-1%

REM Make the batch directory the current directory and change the default drive
cd /D %batchDirectory%


Using batch parameters

You can use batch parameters anywhere within a batch file to extract information about your environment settings.

Cmd.exe provides the batch parameter expansion variables %0 through %9. When you use batch parameters in a batch file, %0 is replaced by the batch file name, and %1 through %9 are replaced by the corresponding arguments that you type at the command line. To access arguments beyond %9, you need to use the shift command. For more information about the shift command, see Shift The %* batch parameter is a wildcard reference to all the arguments, not including %0, that are passed to the batch file.

For example, to copy the contents from Folder1 to Folder2, where %1 is replaced by the value Folder1 and %2 is replaced by the value Folder2, type the following in a batch file called Mybatch.bat:

xcopy %1\*.* %2

To run the file, type:

mybatch.bat C:\folder1 D:\folder2

This has the same effect as typing the following in the batch file:

xcopy C:\folder1 \*.* D:\folder2

You can also use modifiers with batch parameters. Modifiers use current drive and directory information to expand the batch parameter as a partial or complete file or directory name. To use a modifier, type the percent (%) character followed by a tilde (~) character, and then type the appropriate modifier (that is, %~modifier).

The following table lists the modifiers you can use in expansion.

Modifier
Description

%~1

Expands %1 and removes any surrounding quotation marks ("").

%~f1

Expands %1 to a fully qualified path name.

%~d1

Expands %1 to a drive letter.

%~p1

Expands %1 to a path.

%~n1

Expands %1 to a file name.

%~x1

Expands %1 to a file extension.

%~s1

Expanded path contains short names only.

%~a1

Expands %1 to file attributes.

%~t1

Expands %1 to date and time of file.

%~z1

Expands %1 to size of file.

%~$PATH:1

Searches the directories listed in the PATH environment variable and expands %1 to the fully qualified name of the first one found. If the environment variable name is not defined or the file is not found, this modifier expands to the empty string.

The following table lists possible combinations of modifiers and qualifiers that you can use to get compound results.

Modifier
Description

%~dp1

Expands %1 to a drive letter and path.

%~nx1

Expands %1 to a file name and extension.

%~dp$PATH:1

Searches the directories listed in the PATH environment variable for %1 and expands to the drive letter and path of the first one found.

%~ftza1

Expands %1 to a dir-like output line.

Note

•

In the previous examples, you can replace %1 and PATH with other batch parameter values.

The %* modifier is a unique modifier that represents all arguments passed in a batch file. You cannot use this modifier in combination with the %~ modifier. The %~ syntax must be terminated by a valid argument value.

You cannot manipulate batch parameters in the same manner that you can manipulate environment variables. You cannot search and replace values or examine substrings. However, you can assign the parameter to an environment variable, and then manipulate the environment variable.

How to find the last interactive logons in Windows using PowerShell

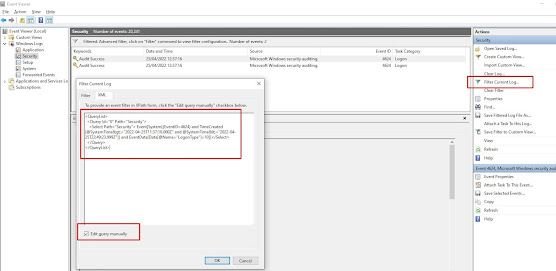
Use the following powershell script to find the last users to login to a box since a given date, in this case the 21st April 2022 at 12pm un...